


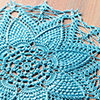


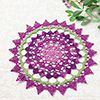


Doily of the Month - July

Spiderwebs Among the Daisies
Design by Maggie Petsch
Skill Level
Intermediate
Size
Approximately 15 inches x 18 1/2 inches
Materials
- J.&P. Coats Knit-Cro-Sheen crochet cotton size 10 (150 yds per ball): 3 balls periwinkle #110 and 2 balls white #1
- J.&P. Coats Lustersheen knit and crochet sport weight thread (1.75 oz per ball): 1 ball each white #1 and buttercup #227
- Size 3 steel crochet hook or size needed to obtain gauge
- Tapestry needle
- Sewing needle and yellow and white sewing thread
Gauge
- 4 tr = 9/16 inch with 2 strands crochet cotton size 10 held tog
- Check gauge to save time.
Pattern Notes
- Join rnds with a sl st unless otherwise stated.
- Place mat is worked with 2 strands size 10 cotton held tog throughout.
- Sport weight thread is used for embroidery only.
Pattern Stitches
- Foundation tr: [Yo hook] twice, insert hook in indicated st, yo, draw up a lp, yo, draw through 1 lp on hook (base made), [yo, draw through 2 lps on hook] 3 times.
- Bl inc at beg of row: Ch 6, tr in 5th ch from hook, tr in next ch, tr in next tr.
- Bl inc at end of row: Foundation tr in 4th ch of turning ch-4 or 6th ch of turning ch-6, [foundation tr in base of foundation tr just worked] 3 times.
- Joining ch (jch): Ch 2, sl st in indicated ch on previous motif, ch 2.
- Joining tr (jtr): Holding back on hook last lp of each st, tr in each of 2 indicated sps, yo, draw through all 3 lps on hook.
- Joined bls (jbls): 3 tr in next sp, jtr over same sp and first free ch-5 sp of next motif, 3 tr in same sp as last leg of jtr just made.
- P: Ch 3, sl st in last sc made.
- Sc3tog: Draw up a lp in each of next 3 sts, yo, draw through all 4 lps on hook.
Row A
First motif
- Row 1 (RS): With periwinkle, ch 3 (foundation ch), ch 4 more (turning ch-4), tr in 5th ch from hook, tr in each of next 2 chs, turn. (4 tr, counting turning ch-4 as first tr)
- Row 2: Bl inc at beg of row, ch 14, sk 2 tr, bl inc at end of row, turn.
- Row 3: Bl inc at beg of row, ch 7, sc in next ch-14 sp, ch 7, sk 3 tr, bl inc at end of row, turn.
- Row 4: Bl inc at beg of row, ch 7, sc in next ch-7 sp, sc in next sc, sc in next ch-7 sp, ch 7, sk 3 tr, bl inc at end of row, turn.
- Row 5: Bl inc at beg of row, ch 7, sc in next ch-7 sp, sc in each of next 3 sc, sc in next ch-7 sp, ch 7, sk 3 tr, bl inc at end of row, turn.
- Row 6: Sl st in each of first 4 tr, ch 4 (counts as first tr throughout), 3 tr in next sp, ch 7, sk next sc, sc in each of next 3 sc, ch 7, 3 tr in next sp, tr in next tr, turn.
- Row 7: Sl st in each of first 4 tr, ch 4, 3 tr in next sp, ch 7, sk next sc, sc in next sc, ch 7, 3 tr in next sp, tr in next tr, turn.
- Row 8: Sl st in each of first 4 tr, ch 4, 3 tr in next sp, ch 2, 3 tr in next sp, tr in next tr, turn.
- Row 9: Sl st in each of first 4 tr, ch 4, 2 tr in next sp, tr in next tr, do not turn.
Edging for first motif
- [Ch 5, sl st in upper corner of bl at end of previous row] 3 times, ch 5, sl st in upper corner of bl at end of previous row, ch 5, sl st in lower corner of same bl, [ch 5, sl st at lower corner of bl at end of previous row] 3 times, ch 5, sl st at lower corner of bl at end of previous row, ch 5, sl st at opposite lower corner of same bl, [ch 5, sl st at lower corner of bl at end of next row] 3 times, ch 5, sl st at lower corner of bl at end of next row, ch 5, sl st at upper corner of same bl, [ch 5, sl st at upper corner of bl at end of next row] 3 times, ch 5, sl st at upper corner of bl at end of next row, ch 5, sl st at opposite upper corner of same bl, fasten off.
Second-fourth motifs
- Rows 1-9: Rep Rows 1-9 of first motif.
Edging for second-fourth motifs
- [Ch 5, sl st in upper corner of bl at end of previous row] 3 times, ch 5, sl st in upper corner of bl at end of previous row, jch to corresponding ch-5 sp on previous motif, sl st in lower corner of same bl on working motif, continue around as for first motif edging.
Row B
First motif
- Rows 1-9: With white, rep Rows 1-9 of first motif for Row A.
- [Ch 5, sl st in upper corner of bl at end of previous row] 3 times, ch 5, sl st in upper corner of bl at end of previous row, jch to corresponding ch-5 sp at top of first motif on previous row, sl st in lower corner of same bl on working motif, *[jch to next ch-5 sp on previous motif, sl st at lower corner of next bl on working motif] 3 times, jch to next ch-5 sp on previous motif, sl st at lower corner of next bl on working motif *, jch to joining between 2 motifs on previous row, sl st in opposite lower corner of same bl on working motif (1 side joined), rep from * to *, jch to next ch-5 sp on previous motif, sl st at upper corner of same bl on working motif (2 sides joined), continue around as for Row A first motif edging.
- Rows 1-9: Rep Rows 1-9 of Row B first motif.
- Rep instructions for Row B first motif edging, working first jch to ch-5 sp at top of next motif on previous row.
Rows C, D & E
- Referring to photo and joining diagram for placement, rep Row A and Row B alternately, ending with Row A and joining motifs on as many sides as indicated.
- Rnd 1: With RS facing, attach white with a sl st in ch-5 sp at top of 4th motif of Row E, ch 4, 3 tr in same sp, [ch 2, 4 tr in next ch-5 sp] 3 times, *[ch 2, jbls, {ch 2, 4 tr in next sp} 7 times] twice, ch 2, jbls, [ch 2, 4 tr in next sp] 12 times, ch 2, jbls, [ch 2, 4 tr in next sp] 7 times, ch 2, jbls *, [ch 2, 4 tr in next sp] 12 times, rep from * to *, ch 2, jbls, [ch 2, 4 tr in next sp] 8 times, ch 2, join in 4th ch of beg ch-4, fasten off.
- Rnd 2: With RS facing, attach periwinkle with a sl st in joining st, ch 1, sc in same st, sc in next st, ch 2, sc in each of next 2 sts, *[{sc, p, sc} in next sp, sc in each of next 4 tr] 3 times, [sc, p, sc] in next sp, sc in each of next 2 tr, sc3tog, sc in each of next 2 sc, [{sc, p, sc} in next sp, sc in each of next 4 tr] 3 times, [sc, p, sc] in next sp, sc in each of next 2 tr, ch 2, sc in each of next 2 tr, rep from * twice, [{sc, p, sc} in next sp, sc in each of next 4 tr] 4 times, [sc, p, sc] in next sp, sc in each of next 2 tr, ch 2, sc in each of next 2 tr, **[{sc, p, sc} in next sp, sc in each of next 4 tr] 3 times, [sc, p, sc] in next sp, sc in each of next 2 tr, sc3tog, sc in each of next 2 tr, [{sc, p, sc} in next sp, sc in each of next 4 tr] 3 times, [sc, p, sc] in next sp, sc in each of next 2 tr, ch 2, sc in each of next 2 tr] †, rep from ** once, [{sc, p, sc} in next sp, sc in each of next 4 tr] 4 times, [sc, p, sc] in next sp, sc in each of next 2 tr, ch 2, sc in each of next 2 tr, rep from * to †, [{sc, p, sc} in next sp, sc in each of next 4 tr] 3 times, [sc, p, sc] in next sp, sc in each of next 2 tr, sc3tog, sc in each of next 2 tr, [{sc, p, sc} in next sp, sc in each of next 4 tr] 3 times, [sc, p, sc] in next sp, sc in each of next 2 tr, ch 2, sc in each of next 2 tr, [{sc, p, sc} in next sp, sc in each of next 4 tr] 4 times, [sc, p, sc] in next sp, join in beg sc, fasten off.
- Starch place mat lightly. Let dry.
Embroidery
Petals
- With tapestry needle and sport weight thread, referring to photo for color placement, rep instructions for embroidery of petals for Embroidered Antique Spiderweb Doily, working white and buttercup petals on alternate periwinkle motifs.
- Flower center (make 6 with white, 6 with buttercup)Leaving a 2-inch length at beginning, ch 80, fasten off.
- Rep instructions for center flower center for Embroidered Antique Spiderweb Doily, tacking white centers to buttercup petals and buttercup centers to white petals with sewing needle and matching sewing thread.
From Collectible Doily Series, © 2001, House of White Birches
DOWNLOAD
Click here to download the PDF (542.9 KB)
| Other doilies in the series: |


Follow Us On ...