


Row 9: Ch 3, sc in each of center 3 dc of next 5-dc group, ch 3, *sc in each of center 3 dc of next 5-dc group, ch 3, rep from * 19 times, sc in each of center 3 dc of next 5-dc group, ch 3, sc in beg ch-1, turn.
Revisions & Updates

April 2009
Lovely Ruffles Shawl, page 36

Hoosier Granny Shrug, page 22

ASSEMBLY
Using Placement Diagram as guide, with 1 strand of yarn, sew squares together 4 x 6.
EDGING
With RS facing, using 2 colors held tog, join yarns with sc, sc evenly around outer edge, working 3 sc in each outer corner,
join in beg sc, fasten off.
To form armholes of Shrug as indicated on diagram,
sew squares tog across A to A and B to B. Wear with hands through remaining 2-square holes on each side.
Gardener's Apron, page 52
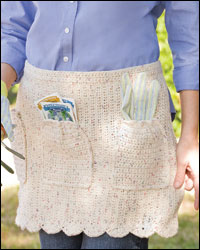
Finishing
For apron ties, using sewing needle and thread, center and sew grosgrain ribbon to back of Waistband. Seal ends of ribbon with fray check.
Right Way Market Bag, page 40
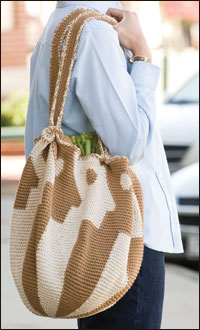
HANDLES & RIM
Rnd A: Cut only almond, ch 96 bark (still attached to bag), insert hook into 36th sc from base of ch, beg to carry almond (leave 3-inch tail in first st), sc 1 bark, 18 almond, 18 bark, 18 almond, 16 bark, ch 96 bark, insert hook into 36th sc from base of ch, beg to carry almond (leave 3-inch tail in first st), sc 3 bark, 18 almond, 18 bark, 18 almond, 17 bark. (338 sc)
Rnd B: Sc bark in first st (this is the st that the ch-96 is worked out of), sc 96 bark on to the ch, sc 1 bark while carrying almond tail (until it runs out), sc 18 almond, join almond and bark tog and with them still attached to the bag, ch 6, lay the strap (from inside to outside) between the rim and the ch, then capture the strap by inserting the hook into the 7th sc away from the base of the ch, sc 12 bark, sc 6 almond, join the almond and bark tog and with them still attached to the bag, ch 6 bark, lay the next strap (from inside to outside) between the rim and the ch, then capture the strap by inserting the hook into the 7th sc away from the base of the ch, sc 6 almond, 15 bark, sc 96 bark on to the ch, sc 3 bark while carry almond tail (until it runs out), sc 18 almond, join almond and bark tog and with still attached to the bag, ch 6, lay the strap (from inside to outside) between the rim and the ch, then capture the strap by inserting the hook into the 7th sc away from the base of the ch, sc 12 bark, sc 6 almond, join the almond and bark tog and with them still attached to the bag, ch 6 bark, lay the next strap (from inside to outside) between the rim and the ch, then capture the strap by inserting the hook into the 7th sc away from the base of the ch, sc 6 almond, sc 17 bark.
Rnd C: Sc 98 bark, sc 17 almond, carry other thread and sc 1 almond around ch, sc 5 bark around ch, sc 13 bark, sc 5 almond, carry other thread and sc 6 almond around ch, sc 7 almond, sc 14 bark, sc 101 bark, sc 17 almond, carry other thread and sc 1 almond around ch, sc 5 bark around ch, sc 13 bark, sc 5 almond, carry other thread and sc 6 almond around ch, sc 7 almond, sc 17 bark.
Rnd D: Correct as written.
Rnd E: Correct as written.
Rnd F: Correct as written.
Rnd G: Sc 5 bark, sc 18 almond, sc 14 bark, join almond and bark tog and sc in each sc around working across first 37 sts worked in this rnd, sl st in next st. Fasten off. Turn over Bag and work 2nd Handle as follows:
Rnd E: Insert hook under upper 2 lps of sc in upper right inside corner of rim and strap (st where ch started from), draw through a lop of bark, leaving 3-inch tail, ch 1 with bark, sc 1 bark, sc 1 bark in same sc, sc 3 bark, sc 18 almond, sc 14 bark, sc 1 bark in corner sc, sc 96 bark on strap. (133 sc)
Rnd F: Carry the almond tail (until it runs out) and sc 5 bark, sc 18 almond, sc 110 bark.
Rnd G: Sc 6 bark, sc 18 almond, sc 13 bark, join almond and bark tog and sc in each sc around working across first 37 sts worked in this rnd, sl st in next st. Fasten off.
Ladybug Scrubber, page 12
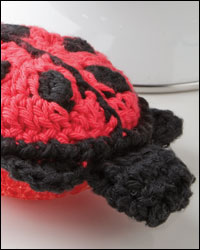
BODY
Rnd 6: Ch 1, sk joining st and next sc, join black with sl st to next sc of rnd 5 (centered between 2 black dc cls of rnd 2), ch 1, sc in joining and in each of next 2 sts, sl st in next st, (sc, hdc, dc) in next st, (dc, hdc, sc) in next st (first foot completed), sl st in next st, sc in each of next 4 sts, sl st in next st, (sc, hdc, dc) in next st, (dc, hdc, sc) in next st (2nd foot completed), sl st in next st, sc in each of next 8 sts, sl st in next st, (sc, hdc, dc) in next st, (dc, hdc, sc) in next st (3rd foot completed), sl st in next st, sc in each of next 4 sts, sl st in next st, (sc, hdc, dc) in next st, (dc, hdc, sc) in next st (4th foot completed), sl st in next st, sc in last st, join in front lp (see Stitch Guide) of first sc.
Rnd 6: Ch 1, sk joining st and next sc, join black with sl st to next sc of rnd 5 (centered between 2 black dc cls of rnd 2), ch 1, sc in joining and in each of next 2 sts, sl st in next st, (sc, hdc, dc) in next st, (dc, hdc, sc) in next st (first foot completed), sl st in next st, sc in each of next 4 sts, sl st in next st, (sc, hdc, dc) in next st, (dc, hdc, sc) in next st (2nd foot completed), sl st in next st, sc in each of next 8 sts, sl st in next st, (sc, hdc, dc) in next st, (dc, hdc, sc) in next st (3rd foot completed), sl st in next st, sc in each of next 4 sts, sl st in next st, (sc, hdc, dc) in next st, (dc, hdc, sc) in next st (4th foot completed), sl st in next st, sc in last st, join in front lp (see Stitch Guide) of first sc.
Forsythia, page 25

SLEEVE
Cap Shaping (page 60)
Sl st in each of next 5 [7, 9, 11] sts, ch 1, sc in ... sc in next st, turn. (54 [54, 58, 58] sts)
Continue in established pattern, at same time ... row 5 [3, 2, 2] times. (42, [46, 52, 52] sts)
Next rows: Work in established pattern for 8 [7, 6, 6] rows with no dec, then dec 2 sts at each end of every row 7 [6, 7, 7] times.
At end of last row, fasten off. (18 [22, 24, 24] sts at end of last row)
Child's Vintage Cloche & Top, page 32
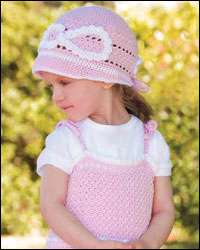
VISOR
Row 2: Ch 1, sl st loosely in each of next 5 sc, sc in each of next 59 sc, sl st in next sc, leaving rem sc unworked, turn. Fasten off.
Row 3: Join MC with sl st in first st, loosely sl st in each of next 4 sc, sc in each of next 49 sc, sl st in next sc, leaving rem sc unworked, turn.
Row 2: Ch 1, sl st loosely in each of next 5 sc, sc in each of next 59 sc, sl st in next sc, leaving rem sc unworked, turn. Fasten off.
Row 3: Join MC with sl st in first st, loosely sl st in each of next 4 sc, sc in each of next 49 sc, sl st in next sc, leaving rem sc unworked, turn.


Follow Us On ...