


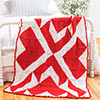


Afghan of the Month: August

Gingham Garden
Design by Carol Alexander
Strips of plush pink flowers alternating with pretty gingham panels come together in perfect harmony in this enchanting floral throw that’s a perfect accent for your spring or summer decor.
Skill Level
Intermediate
Finished Size
51 x 69 inches
- Medium (worsted) weight yarn:
- 32 oz/1,600 yds/907g white
- 21 oz/1,050 yds/595g light rose
- 14 oz/700 yds/397g rose
- 7 oz/350 yds/198g sage green
- Size H/8/5mm crochet hook or size needed to obtain gauge
- Tapestry needle
Gauge
Panel A Motif = 5 1/2 inches Panel B = 4 sc = 1 inch; 4 sc rows = 1 inch; panel = 3 1/2 inches wide
Pattern Note
Change color (see PDF) in last stitch made. Carry dropped color along top of stitches and work over it with new color.
Instructions
Motif
Make 60.
- Rnd 1: With rose, ch 4, sl st in first ch to form ring, ch 3 (counts as first dc), 11 dc in ring, join with sl st in 3rd ch of beg ch-3. Fasten off. (12 dc)
- Rnd 2: Join white with sl st in first st, ch 3, dc in same st, 2 dc in each dc around, join with sl st in 3rd ch of beg ch-3. (24 dc)
- Rnd 3: Ch 2 (counts as first hdc), hdc in each of next 4 dc, 2 hdc in next dc, [hdc in each of next 5 dc, 2 hdc in next dc] 3 times, join with sl st in 2nd ch of beg ch-2. Fasten off. (28 hdc)
Flower Petals
With RS facing, join light rose with sl st around front of post (see PDF) of any dc on rnd 1 of Motif, *ch 1, (sc, ch 1, hdc, ch 1) around post of same dc, sl st in lp on front of post of dc on rnd 2 directly behind to tack petal, ch 1, sc around post of last hdc made, hdc around post of same dc on rnd 1, sl st around post of next dc on rnd 1, rep from * 11 times, tacking petals to every other dc of rnd 2, join with sl st in beg sc. Fasten off.
Motif Continued
- Rnd 4: Join sage green with sl st in any hdc of rnd 3, ch 3, (3 dc, ch 2, 4 dc) in same sc, *ch 1, sk next 2 sts, sc in next st, ch 2, sc in next st, ch 1, sk next 2 sts**, (4 dc, ch 2, 4 dc) in next st, rep from * around, ending last rep at **, join with sl st in 3rd ch of beg ch-3. Fasten off.
- Rnd 5: Join white with sl st in any corner ch-2 sp, ch 1, *3 sc in corner ch-2 sp, ch 5, (dc, ch 3, dc) in next ch-2 sp, ch 5, rep from * around, join with sl st in beg sc.
- Rnd 6: Ch 1, *sc in each of next 3 sc, (hdc, 3 dc) in next ch-5 sp, (3 tr, ch 2, 3 tr) in next ch-3 sp (corner group), (3 dc, hdc) in next ch-5 sp, rep from * around, join with sl st in beg sc. Fasten off.
Panel A
Make 5.
With tapestry needle and matching yarn, whipstitch Motifs with RS tog to form strip 12 Motifs long.
Edging
With RS facing, join white with sl st in corner ch-2 sp at right end of long edge of strip, ch 1, 2 sc in same corner sp, [sc in each of next 17 sts across to next Motif joining, 2 sc in each of 2 corner sps at joining] 11 times, sc in each of next 17 sts across to last corner sp, 2 sc in last corner sp. Fasten off. (252 sc)
Rep on opposite long edge of strip.
Outside Panel B
Make 2.
- Row 1 (RS): With white, ch 252, with rose, ch 1 more, dropping white, beg in 2nd ch from hook [sc in each of next 4 chs, change colors (see Pattern Note) to light rose, sc in each of next 4 chs, change to rose] 31 times, sc in each of last 4 chs, turn. (252 sc)
- Rows 2–4: Ch 1, sc in each sc across, following established color sequence, turn. At end of row 4, change to light rose on last sc. Fasten off rose.
- Row 5: Ch 1, [sc in each of next 4 sc, change to white, sc in each of next 4 sc, change to light rose] 31 times, sc in each of last 4 sc, turn.
- Rows 6–8: Ch 1, sc in each sc across, following established color sequence, turn. At end of row 8, change to rose on last sc. Fasten off white.
- Rows 9–12: Ch 1, sc in each sc across, following color sequence established in rows 1–4. At end of row 12, fasten off.
Inside Panel B
Make 4.
- Rows 1–12: Rep rows 1–12 of Outside Panel B.
- Row 13: With WS facing, join white with sl st in first st at right end of row 12, turn, sl st in each sc across. Fasten off.
Assembly
With RS tog, whipstitch Panels A and Inside Panels B tog alternately, beg with Panel A. Whipstitch foundation ch of Outside Panels B on each outside edge of Panels A.
Border
Make 4.
- Rnd 1: With RS facing, join white with sl st in any corner, ch 3 (counts as first dc), (dc, ch 2, 2 dc) in corner, evenly sp dc around, working (2 dc, ch 2, 2 dc) at each corner, join with sl st in 3rd ch of beg ch-3.
- Rnd 2: Sl st in next dc and next ch-2 sp, ch 3, (dc, ch 2, 2 dc) in same ch sp, *dc in each dc across to next corner ch-2 sp**, (2 dc, ch 2, 2 dc) in corner sp, rep from * around, ending last rep at **, join with sl st in 3rd ch of beg ch-3. Fasten off.
- Note: On following rnd, adjust spacing of sts as needed when working between ** to accommodate st sequence, keeping number of scallops on opposite sides equal.
- Rnd 3: Join sage green with sl st in any corner ch-2 sp, ch 1, *(sc, 3 dc, sc) in corner ch-2 sp, sk next st, **(sc, dc) in next st, (2 dc, sc) in next st, sk next 2 sts, rep from ** across, ending 3 sts from next corner ch-2 sp, (sc, dc) in next st, (2 dc, sc) in next st, sk last st before corner sp, rep from * 3 times, join with sl st in beg sc. Fasten off.
Copyright © 2014 Annie's. All rights reserved.
DOWNLOAD
Click here to download the PDF (495.2 KB)
| Other afghans in the series: |
Other crochet project series:


Follow Us On ...